About Mahjong Valley
Flat mahjong pairing rather than a stacked pyramid: clear the board by matching two identical tiles that sit in the same row or column with nothing between them, and slide a tile into an empty cell when no pair lines up. The first level teaches the four tap patterns and the two slide directions one step at a time, and a hint bulb and a shuffle button carry counted charges for the boards that lock up.
A single-layer mahjong pairing game: two identical tiles clear only when they share a row or a column with nothing between them, and when nothing lines up you slide a tile into an empty cell to build the line — there is no stacked pyramid to peel and no difficulty picker on the way in.
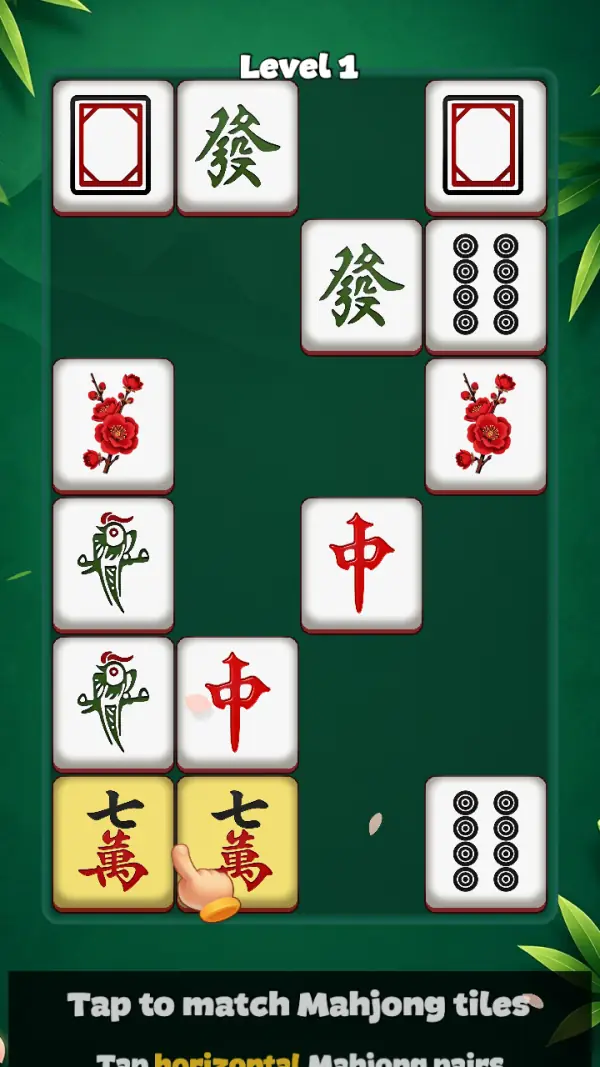
The first thing Level 1 asks of you is a rule, not a goal. A dark panel slides up from the bottom of the screen and reads "Tap to match Mahjong tiles" over a second line with one word picked out in gold — "Tap horizontal Mahjong pairs" (frame 1). Below it two 七萬 tiles sit side by side in the bottom row, tinted gold, with a cartoon hand resting on the right one. The whole first board is a lesson in reading lines rather than a puzzle to solve.
What that board is made of settles the genre question. Every tile sits on one flat plane, scattered with empty cells between them, and each face is a full mahjong tile: 發, 中, the bird that stands for one bamboo, a ring of dots, plum and chrysanthemum blossoms, and two tiles carrying nothing but a red rectangular frame (frame 1). There is no second storey, no half-covered tile and no shadow under a stack, because there is no stack — which is the whole difference from the layered mahjong solitaire the catalogue blurb describes.
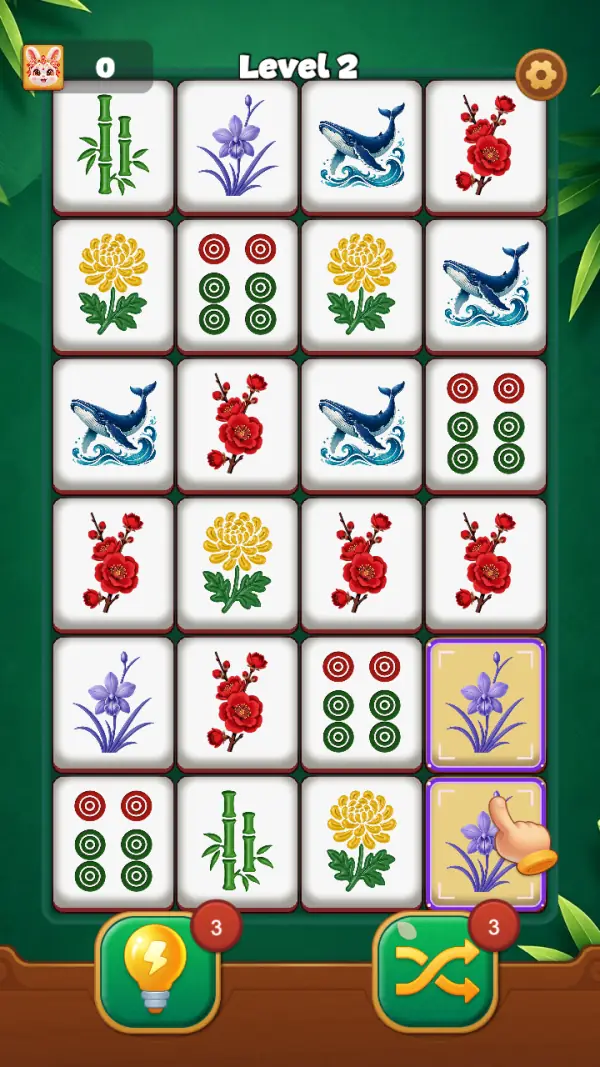
Level 2 deals the same tray full: four columns by six rows, twenty-four tiles, faces repeating — bamboo, iris, whale, plum, chrysanthemum and a dot tile drawn as two red rings over four green ones (frame 4). The furniture is minimal: a rabbit-face badge reading 0 in the top-left corner, a gear in the top-right, the level name centred above the tiles, and two fat buttons on the wooden shelf under the board — a light bulb left, crossed arrows right, each wearing a red count badge reading 3 (frame 4). Nothing anywhere on the board counts down.
Gameplay screenshots
Captured from the build running on this page, not promotional art. Every claim in the guide above names the frame it comes from.

How to Play
- Start with the pairs that touch. The game's own first lessons are adjacency — "Tap horizontal Mahjong pairs", then the vertical version (frame 1).
- Then run your eye down a row or a column past the gaps: a clear line is enough however far apart the two tiles are, but only if nothing stands in the middle (frame 4 shows the blocked version — two whale tiles either side of a flower).
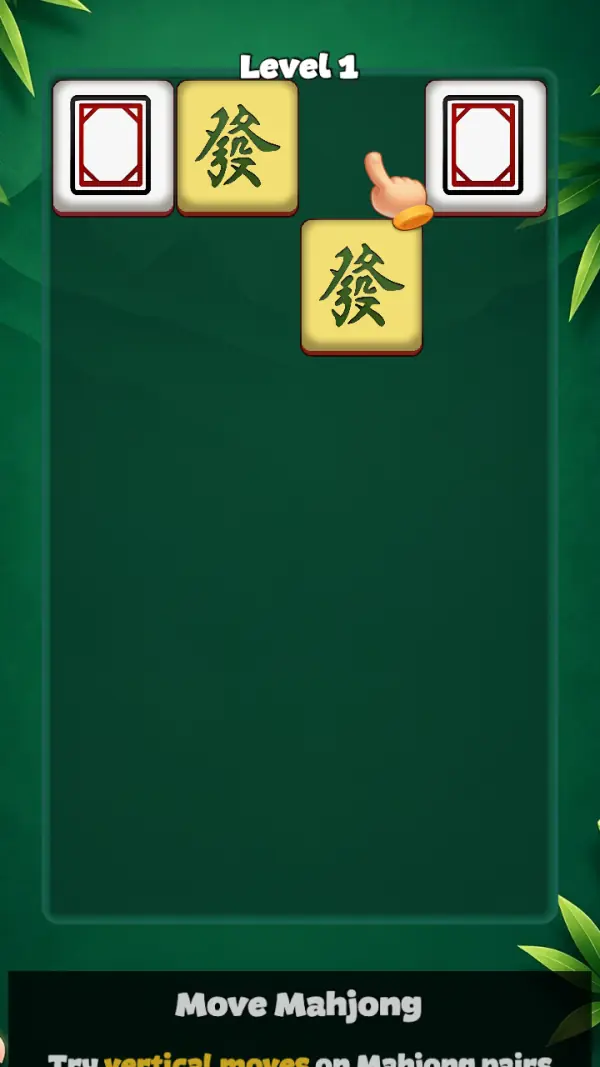
- When nothing lines up, drag a tile along its row or its column into an empty cell to make the line. That is the "Move Mahjong" step, and it is how you reach a pair that sits on a diagonal (frame 2).
- Clear the pairs sitting in the way of the pair you want. Holes are permanent, so every removal widens the lines left on the board (frames 1–2).
- Tap the bulb when you cannot find a pair and the crossed arrows when the board genuinely has none to line up. Both badges show what you have left before you commit (frame 4).
- Empty the board rather than playing for points — the level ends on the last pair and pays out tool charges (frame 3).
The pair has to see itself
Same row or same column, with nothing in between. The tutorial spends four of its seven steps on the variations — horizontal pairs, vertical pairs, then "distant same-row" and "distant same-column" pairs (frame 1 shows the first of those lines as the game renders it). "Distant" is qualifying how far the clear line may run, not licensing a route around the board: in frame 4 the third row holds two whale tiles with a plum blossom sitting between them, and that is a row of three look-alikes with no pair in it.
Tiles slide; the board does not
The fifth and sixth steps change the verb: "Move Mahjong", "Try horizontal pair moves", then "Try vertical moves on Mahjong pairs" — frame 2 is caught on exactly that panel, with the level down to four tiles. A tile can be pushed along its row or column into an empty cell, which is how you build a line that does not exist yet. What the board never does is close up: between frames 1 and 2 the Level 1 tray empties almost completely and the two 發 tiles are still sitting in the cells they started in. Cleared pairs leave holes, and nothing falls into them.
Two tools, both metered
The bulb and the crossed arrows carry counts, not free uses — both badges read 3 on the first board you actually play (frame 4). Clearing a level hands out more: the panel between Level 1 and Level 2 shows a bulb, a rabbit card and the crossed arrows with "×2" beside them (frame 3). So the tools are a stock you build up and spend down, and the level-clear payout is where the stock grows. Under that panel sits a green "Reward" button wearing a red "2+" flag and a film-strip icon (frame 3) — the ad-backed version of the same payout.
The rabbit in the header
A rabbit-face chip in the top-left corner reads 0 across the Level 2 board (frame 4), and no label on screen says what it counts. No captured frame shows it move, so it is best read as a collectible the game tracks rather than as your score — there is no score anywhere on the board.
Tips & strategies
- An empty cell is a permanent lane, not a temporary gap. Slide tiles into the holes near the pair you are chasing, and leave the rows that already have a clear line alone.
- Work the crowded corners first. On a full board like Level 2 (frame 4) most faces appear two or four times, so a tile with several identical neighbours in its row is a better first move than an isolated pair.
- The tool badges are a budget you can read before tapping (frame 4). Three charges is enough to finish a board you have actually looked at, and not enough to finish one you are guessing at.
- A shuffle restacks the whole board you are trying to remember, so it costs you your own read of the layout as well as a charge. Take a lap of the board first.
- There is no clock on any captured frame (frames 1, 2, 4), so a locked board costs a tool charge and nothing else. Staring at it is free.
Where players go wrong
- Looking for a pyramid to peel. Every tile here is on the same plane, and there is no free-tile rule to learn — the constraint is the line, not the stack.
- Tapping two identical tiles that share a row but have a neighbour between them. That is not a pair, and the board will not pretend otherwise (frame 4).
- Treating a diagonal pair as dead. It is usually one slide away — the game teaches the slide for exactly this reason (frame 2).
- Believing the blurb. The difficulty choice the store copy describes does not appear on the way into a level here; the game deals the board and lets you play it.
Playing on phone, tablet and desktop
Portrait and built for one thumb: the board owns the middle of the screen, the two tool buttons sit on the shelf beneath it, and the settings gear is top-right where the rabbit chip is top-left (frame 4). The tutorial panel rises from the bottom edge and is clipped mid-animation in both Level 1 frames (frames 1–2), which is the tween and not a layout that wants a bigger screen. No keyboard control appears on any captured frame — everything is a tap or a drag.
Frequently Asked Questions
How do you clear a pair in Mahjong Valley?
Two identical tiles in the same row or the same column, with no tile between them. The tutorial drills the four versions of that — horizontal, vertical, distant same-row and distant same-column — across its first steps (frame 1).
Can you move tiles around?
Yes, and the game teaches it as its own step: "Move Mahjong", with "Try horizontal pair moves" and "Try vertical moves on Mahjong pairs" (frame 2). A tile slides along its row or column into an empty cell, which is how you create a line that does not exist yet.
Is this the stacked mahjong solitaire where you peel a pyramid?
No. Every tile sits on a single flat layer with gaps around it (frames 1–2), and a full board is a four-by-six grid (frame 4). Nothing is half-covered, so there is no free-tile rule.
What do the bulb and the crossed arrows do?
They are hint and shuffle, and both are metered — each badge shows the charges left, reading 3 on Level 2 (frame 4). Clearing a level pays out more, including a shuffle badged "×2" (frame 3).
What is the rabbit counter in the corner?
It reads 0 through the Level 2 frames (frame 4) and nothing on screen labels it. No captured frame shows it increasing, so we are not going to invent what it counts.
Is there a time limit?
No clock appears on the board in any captured frame. The pressure is board state, not the timer — a locked layout costs you a shuffle charge, not a run.